Monday, 29 July 2013

How To Root LG Optimus L9

Hello good people.Today i am going to guide you on "How To Root LG Optimus L9".as we know LG Optimus L series is going really well.this LG optimus L9 with good camera and processor.so before starting the root process we have some requirements.

Requirements.


1. Backup all your important data.

2. We need to Enable USB Debugging.Go to Settings > Manage Application > Development >USB Debugging.Click the check box.

3. Maintain battery charge more than 60% .

4. We need to have BootLoader to be Unlocked.

5. Download USB drivers for LG Optimus L9 .

6. Download root files Root Package and RunMe.txt

7. We need to have Bootloader unlocked.if not,Unlock it here.
Procedure.

Step 1. After you have downloaded Root package and Runme.txt copy it to your computer.and extract "Root Package"

Step 2. Now rename "RunMe.txt" to "RunMe.bat" and paste it on the extracted folder.

Step 3. Now inside this folder Open "RunMe.bat" and click 1 to select "Normal Mode"

Step 4. Now when you Open it you will get a prompt.now click "Restore my data" this will send the superuser to your device.

Step 5.Now your phone is successfully rooted.to use the superuser we first need to download SuperUser and Busybox from playstore for free.

Now you have successfully rooted your phone.

How To Add Facebook Like Box On Your Blogger website.

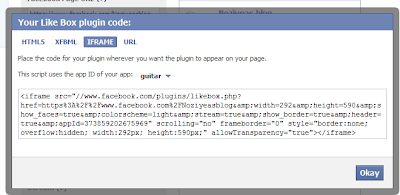
Hello good people.Today i am going to show you how to "Add Facebook Like Box On Your Blogger website". So now with your Facebook fan page you are going to connect it to your blogger website.this will bring more traffic to your website from facebook fan page.and will increase the fan page likes very fast.before you are going to start the process you need to have a facebook fan page and blogger website.so now lets start the procedure.

Procedure.

Step 1. Open facebook Like box generator page from here.make sure you are logged in to facebook currently.

Step 2. Now we Need to change the Facebook page URL to the URL of your facebook fan page.
Note-You can uncheck the "Show stream" if you dont want like box to show news feed.

Step 3. Now click "Get Code" and copy the "iframe" code .
Step 4. Now go to your blogger dashboard > layout then click "add a gadget".then scroll down and select "HTML/Java script" click on the blue Plus button.
Step 5. Now a Small window will open with "Title" and "Content" put the cane of your website in "Title" and paste the Code in the "Content" and save it.
Step 6. After you have saved the HTML/JavaScript you are done with it.now save the arrangement and look for facebook like box in your blogger website.


How To Root HTC Desire X And Install CWM recovery

Hello good people.Today i am going to guide you on How To Root HTC Desire X and Install CWM                  Recovery.this is the simplest way to root HTC Desire X. And using Clockworkmod Recovery you can flash  custom rom on your device giving you full control over your phone.rooting can also used to flash custom recovery.img to overclock the processor.  so before rooting and installing we need some requirement.make a complete backup of your important data.

Requirements.

1. Backup all your important data.

2. We need to Enable USB Debugging.Go to Settings > Manage Application > Development >USB Debugging.Click the check box.

3. Maintain battery charge more than 60% .

4. We need to have BootLoader to be Unlocked. Use this guide to do that.

5.  Download HTC Desire X drivers and Install it.

6.  Download root files. cwm for jelly bean. Superuser-3.1.3-arm-signed.zip and Root kit.

7.You need to have a computer to root.

Procedure.

Step 1. Once you have downloaded all the requirement files.Extract the "root kit" on your computer.

Step 2. Devices which are updated to jellybean follow "Step 3"

Step 3. Now place the "cwm" file that you have downloaded to Recoveries folder inside Desire x all in one kit folder.and rename the file to "recovery.img"

Step 4. Now go to extracted folder and open "Desire.exe"

Step 5. Now you will find a option "Next Flash a Recovery" choose this.

Step 6. Now jelly bean devices select "your own recovery" and click "Flash recovery" button. for Iceam sandwich devices select the other option and click "Flash recovery" button.

Step 7. Now we have installed cwm on to your device.lets Root the device.so now copy the superuser.zip that you have downloaded on to your SD card.

Step 8. Reboot the device and press "Volume Down + Power" Button together for few seconds.after that select "Recovery"

Step 9. Now from clockworkmod (cwm) recovery you have to install superuser.zip.to do that select "Install ZIP from SD card" and find the superuser.zip file that you have downloaded.then click Yes.

Step 10. Now wait for few minutes and installation of superuser will be completer.now reboot your device and you can see super user app available.

How To Root Micromax Canvas HD A116

Hello Good People.today i am going to show you How To Root Micromax A116 Canvas HD.
now we are going to start the rooting process.so before that we need  to do some Pre-requisite.

Pre-requisite.

1.Make sure you have done a full backup of your data.

2. We need to enable USB debugging.go to Settings > Manage Applications > Development > USB Debugging.click check box.

3. Make sure you have Clockworkmod Recovery installed in your device.

4. Maintain battery charge more than 60%.

5. Install USB drivers for your device.

Procedure.

Step 1. We need to download superuser package and superuser bin and place it SD card.

Step 2. Now we need to go to Recovery mode.Reboot your phone by pressing "Volume Up + Power button."Note-You can navigate in cwm recovery by pressing volume button and select be Power button.

Step 3.Now  first we have to "wipe data and factory reset".select this option and click yes.then "wipe cache" then inside Advance "wipe dalvik cache" wipe all the 3 mentioned above.

Step 4. Now we are going to flash the Superuser files to the device.Now go to main menu in Clockworkmod recovery and select "Install ZIP from SD card".then find the file "Superuser-3.1.3-arm-signed.zip" from the sd card and install it.now after that again select "su-bin-3.1.1-arm-signed.zip" and install it.
Step 5. Now reboot your device normally.now you have successfully rooted your phone.you can see superuser app available.

Tuesday, 23 July 2013

How to root Sony Xperia L


How to root Sony Xperia L

Hello good people.today i am going to show you how to root Sony Xperia L.really a good phone with 1.0GHz snapdragon processor.it has 1GB of RAM makes it powerful.so now lets begin with the rooting.

Pre-requisties and requirement.

1. Enable USB debugging mode,in settings>development Options, check Development Options then check USB Debugging down there.

2. You need Sony xperia L USB driver for windows.

3. Make sure you have 70% battery charged.

4. Make a complete backup of your phone.

5. Sony xperia L - Unlock Bootloader


File needed.
1. Extracted stock kernel. download

Procedure.

Step 1: Unlock Sony Xperia L bootloader.

Step 2: Set fastbook in your computer if your dont have it.

Step 3: Once you have done with setting up.make a newfolder name it as fastboot.now fastboot.exe from android-sdk/tools to newfolder.and also copy adb.exe and adbwinapi.dll from android-sdk/platform-tools to new folder.

Step 4: Once you have the Extended stock kernel.zip file downloaded.extract it to another folder.now copy the boot.img from that folder to the fastboot folder that you just created.

Step 5: Now we have to get into fastboot Mode.to do this Hold Volume Up button while connecting the USB cable.

Step 6: Now in your computer go to command prompt.u can find it by typing command prompt in "run".

Step 7: Now to naviagte to the fastboot folder type "C:\fastboot" after you have entered it then type "fastboot flash boot boot.img" this will flash boot.img file to your phone.

Step 8: Now reboot your phone and check the rooting is successfully done.

Saturday, 20 July 2013

How To Root Samsung Galaxy S duos S7562

How To Root Samsung Galaxy S duos S7562.

Hello good people.today i am going to show you How To Root Samsung Galaxy S duos S7562..now make sure you have battery charge about 70% and do a complete backup of your important files contacts and messages.make sure you have samsung USB drivers installed on your computer.

So now lets begin

Step 1: We need to Download rooting files and extract to your computer.

Step 2: Enable debugging mode. Go to app drawer>settings>manage application>Development>USB  debugging -check box.

Step 3: Now switch off your phone.and reboot your phone by pressing Volume Down +  Power Button together.press power button again to confirm.you will see android repair logo.Now your phone will be in Downloading mode.

Step 4: Now connect your phone to your computer with USB cable.Then open the extracted folder that you have downloaded and open file "odin.exe"

Step 5: Now you will see ID:COM box will turn yellow if the USB connection is successful.Now click "PDA" button select file "recovery.tar" from the folder.

Step 6: "F.Reset time" and "Auto Reboot" should be checked box.and not any other box are to be checked.Now click start button in the Odin and wait for the installation to take place.your phone will restart automatically.

Step 7: Now you have successfully rooted your phone.you can check by looking ab superuser app in the menu.